CRM Software Support Center
RESOURCES

Accounts
What is an Account?
Accounts Tab Page
Viewing Accounts
Custom Account Views
Manage Accounts
Managing Accounts
Creating a New Account
Saving Accounts
Edit an Account
Delete an Account
Print an Account
Account Tools
Import Accounts
Account Web Capture Tool
Account Reports
Adding a Contact
Adding an Opportunity
Adding Multiple Addresses
Adding a Note
Adding a Task

Ajax and COMET Tools
Ajax Contacts Rolodex

Campaigns
What is a Campaign?
Campaigns Tab Page
Viewing Campaigns
Custom Campaign Views
Featured Campaigns
Managing Campaigns
Creating a Campaign
Saving a Campaign
Edit a Campaign
Delete a Campaign
Print a Campaign
Adding a Lead
Adding an Opportunity
Adding an Account
Adding a Contact
Adding a Web Capture Tool

Cases
What is a Case?
Cases Tab Page
Viewing Cases
Custom Case Views
Featured Cases
Manage Cases
Managing Cases
Creating a New Case
Saving a Case
Sending Notification
Edit a Case
Delete a Case
Print a Case
Linking to a Contact
Case Reports
Case Tools
Web Capture Tool
Adding a Note
Adding a Task

Contacts
What is a Contact?
Contacts Tab Page
Viewing Contacts
Custom Contact Views
Manage Contacts
Managing Contacts
Creating a New Contact
Edit a Contact
Delete a Contact
Clone a Contact
Contact Tools
Web Capture Tool
Contact Reports
Adding a Note to a Contact
Adding a Task to a Contact
Adding a Photo to a Contact

Control Panel
Personal Information
Edit Personal Information
Change My Password
Customize My Tabs
Customize Tabs
Customize Buttons
Customize Sidebar
Importing
Set Organization Logo

Control Panel: Import

Corporate Policies
Quick create for policies
Reports for policies

CRM Administration
Overview
Add Company Message
Custom Tabs and Fields
Customize Selection Lists
Rename My Tabs

Custom Page Layout
Overview
Campaigns Layout
Leads Layout
Accounts Layout
Contacts Layout
Opportunity Layout
Contracts Layout

Data Management
Overview
Custom Templates
Signature
External E-mail Settings
Mass E-mail History
Outlook Integration
Importing
Flagged Errors

Documents
What is a Document?
Documents Tab Page
Viewing Documents
Custom Document Views
Retrieving Saved Documents
Document Hierarchy
Featured Documents
Managing Folders
Creating Folders
Editing Folders
Deleting Folders
Managing Documents
Adding Documents
Sending Notification
Editing Documents
Replacing Documents
Deleting Documents
Moving Documents
Manage Documents

Email
Custom Templates
Signature
External Email
Mass Email History
Detailed Mass Email Reports
Mass Email Attachments
MS Outlook Integration
Email to Case
Email to Lead
Viewing Messages
Viewing Folders
Creating a Folder
Composing a Message
Adding Attachments

Events
What is an Event?
Viewing Events
Creating Events
Creating a New Event
Inviting Others
Sending Notification
Editing & Deleting Events

Forecasts
What is a Forecast?
Forecasts Tab Page
Viewing Forecasts
Custom Forecast Views
Featured Forecasts
Forecast Data Fields
Opportunity Data Fields
Creating a New Forecast
Edit a Forecast
Delete a Forecast
Print a Forecast
Forecast Reports

Human Resource Management
Employee Management
Employees tab
Viewing an Employee Record
Employee Policy Violation Reports

Importing Data
Supported Data Types
Importing Your Data

Instant Messages
Personal User Data
Sending Messages
Message Archive
Message Archive Search
Message Key Users

Leads
What is a Lead?
Leads Tab Page
Viewing Leads
Custom Lead Views
Manage Leads
Managing Leads
Creating a New Lead
Sending Notification
Edit a Lead
Clone a Lead
Delete a Lead
Converting a Lead
Generating Lead Reports
Lead Tools
Import Leads
Lead Web Capture Tool
Adding Document to a Lead
Adding Photo to a Lead
Adding a Note to a Lead
Adding a Task to a Lead

Logging In and Out

Microsoft Outlook Integration

Notes
What is a Note?
Viewing Notes
Creating Notes
Editing and Deleting Notes

Opportunities
What is an Opportunity?
Opportunities Tab Page
Viewing Opportunities
Custom Opportunity Views
Manage Opportunities
Managing Opportunities
Creating a New Opportunity
Saving an Opportunity
Edit an Opportunity
Delete an Opportunity
Opportunity Reports
Linking to an Account
Adding a Note
Adding a Task

Organization Mapping with Accounts Parent Account Field

Profiles
Creating and Editing Profiles
Managing Profiles Profile drop-down in User
Add/Edit screens
Disabling a Tab in the Related Records Section
Setting User Login Hours Restrictions (Rules)
Assigning Login Rules to Profiles
Standard Profiles

Public Knowledge Base
Overview
Adding solutions

Reports
Generating Reports
Creating Custom Reports
Editing Custom Reports
Deleting Custom Reports
Filtering Reports & Views
Sorting Reports & Views

Sales Commission Programs
Enabling Commissions Porgram
Sales Commission

Sales Contracts
Contracts tab
Contract Mangement

Skype Integration

Spell Checker

Stay-in-Touch Mass Email
Exporting data
Mail merge

Tab Page Views
Creating Custom Views
Editing Custom Views
Deleting Custom Views

Tasks
What is a Task?
Viewing Tasks
Creating Tasks
Linking Tasks
Editing and Deleting Tasks
Task History

The Sidebar
Adjusting the Sidebar
Sidebar Panel Tools
Search
Advanced Search
My Favorites
Item History
Messenger
Calculator
Company Messages
Date & Time
Calendar

Trash Can
Restoring Deleted Items

Violation of Corporate Policies
Violations tab
Reports on Violations
Quick create for Violations
Importing/Custom Views for Violations
Viewing a Policy
Policy Violation Report

Web based Project Management
What is Web based Project Management ?
Viewing Projects
Viewing Project Tasks
Viewing Project Resources
Viewing Project Expenditures
Featured Projects
Managing Projects
Creating a Project
Saving a Project
Editing a Project
Deleting a Project
Project Tasks
Creating Project Tasks
Adding Project Tasks
Removing Project Tasks
Project Resources
Creating Project Resources
Adding Project Resources
Removing Project Tasks
Project Expenditures
Creating Expenditures
Removing Expenditures
Tracking Project Progress


Web Capture Tool
Creating a Capture Tool
Generating HTML
Editing a Capture Tool
Deleting a Capture Tool
Web Capture Fields

Workflow
Overview
Big Deal Alert
At-Risk Deal Alert
Business Support Hours
Workflow Rules
Workflow Tasks
Workflow Alerts
Adding Conditions

Working with Mass Data

ZIP Code Proxomoty Search

What is a Resource?
Resources are people, equipment and supplies that are needed in order to complete the tasks that are involved with a project


Key Resources
The Key Resources section displays a summary of resources in three categories: Recently Modified, Recently Created and Recently Viewed. These categories can be chosen from the Choose drop down box located in the upper right region of the Key Resources section. To view an resource in detail click the resource title which is underlined to signify that it can be selected.

See Also: Sorting Reports and Views


Manage Resources


Creating a Resource
  • Select New Resources from the list of Add options located toward the top of the page. Selecting this option will bring you to the New Resource page.
  • Fill in your resource information using the Resource Information and Description Information sections of the form. Fields highlighted in red and marked with an asterisk are required fields. All other fields may be left blank if you wish.
  • Save your resource by clicking the Save or Save & New button.
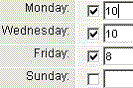
Resource Working Hours Use the Resource Working Hours section to specify the days of the week and work hours for each day the resource is scheduled to work. Check the check box next to each day of the week that you want to schedule the resource to work. Enter the number of work hours for each scheduled day in the text fields provided. When the resource is attached to a task within a project, these values, along with the resource's hourly rate, will be used to calculate how much the resource is costing.

See Also:
Edit or Delete a Resource
Saving a Resource


Saving a Resource
When you have created a new resource or have made changes to an existing resource you will be able to save the resource information using either of the following two methods: i. Select the Save & New button to save your new resource. You will then be presented with a blank form on which you can create another new resource.

ii. Select the Save button to save your new resource. This will bring you to a summary page for your new resource. From this page you can Edit, Delete and Print your resource information.


Edit or Delete a Resource
When the key resources are displayed on the Resources tab page or in a search or generated report only a few details are shown. The resource title is underlined to show that it can be selected. Select an resource name to view the resource in detail. You can now Edit, Delete or Print the resource.

Edit: Click the Edit button to change the information for the resource. Be sure to fill in all required fields. These are highlighted in red and marked with an asterisk. To save your changes click the Save or Save & New button.

Delete: Click the Delete button. You will be prompted to verify that you want to delete the resource. Click OK to delete the resource. Click Cancel to cancel the deletion.

See Also: Saving a Resource


Adding a Resource to a Project
  • Click the Resources tab. This will take you to the Resources tab page.
  • Make a selection from the View drop down box, located in the upper left corner of the Resources tab page.
  • Click the Go! button to generate a list of resources that match your selection. These will be displayed on a new page.
  • Select a resource from the list by clicking the resource title, which is underlined to indicate that it can be selected. This will take you to the details page for the resource.
  • Scroll down to the Projects section. A list of existing projects is available in the Available Projects drop down box. Select the project you want to add the resource to from this list.
  • Click the Add Resource button to add the resource to the project.


Adding a Task to a Resource
  • Click the Resources tab. This will take you to the Resources tab page.
  • Make a selection from the View drop down box, located in the upper left corner of the Resources tab page.
  • Click the Go! button to generate a list of resources that match your selection. These will be displayed on a new page.
  • Select a resource from the list by clicking the resource title, which is underlined to indicate that it can be selected. This will take you to the details page for the resource.
  • Scroll down to the Tasks section. A list of existing tasks is available in the Available Tasks drop down box. Select the task you want to add to the resource from this list.
  • Click the Add Task button to add the task to the resource.

  Education
CRM Glossary
Data Sheets
Getting Started Guide
Product Demos
CRM Implementation Kit
Training
Table of Contents
Fast Track Program
Online Training
Free CRM Trial
FAQ's
Tutorials
Administrative
Export & Import
Introductory
Rollout
CRM Video Tutorials
Role Based Overview
Marketing User
Sales Manager
Sales Rep
Service/Support Manager
Service/Support Rep
  � 2003-2018 Salesboom.com Inc .Salesboom.com All rights reserved. Legal 1.855.229.2043�Various trademarks held by their respective owners.