Click the  or
or  icon
located on the top right corner of the sidebar to orient the sidebar to
the left or right of the screen. Click the
icon
located on the top right corner of the sidebar to orient the sidebar to
the left or right of the screen. Click the  or
or  icon
to hide and restore the sidebar.
icon
to hide and restore the sidebar.
Sidebar Panel Display Options
Sidebar Panel Display Options
Each panel in the sidebar has icons in the top
right corner that enable you to move and close the panel.
Move a Panel
Close a Panel
More Panels
Move a Panel
To move a panel up or down in the sidebar,
click the 
 icons
located in the top right corner of the panel you want to move.
icons
located in the top right corner of the panel you want to move.
Close a Panel
To close a panel, click the  icon
located in the top right corner of the panel you want to close.
icon
located in the top right corner of the panel you want to close.
More Panels
This section lists additional panels that
can be displayed. Panels that you previously closed are also
found in this list.
- Click the + or - icon to expand or contract the list.
- To display a panel in the list, click the Add Panel link.
Sidebar Panel Tools
Each sidebar tool is located on a panel that can be
added or removed from the sidebar. If you do not see the panel you are
looking for, you will have to add it to the sidebar.
See Also: Sidebar Panel Display Options
Search
Favorite Links
Item History
Messenger
Calculator
Company Messages
Date & Time
Calendar
See Also: Sidebar Panel Display Options
Search
The keyword search tool allows you to search your entire salesboom.com database. You can search for a person's name, phone number, address etc. Type the keyword you want to search for into the Search panel text field and click Go!. Your search results will be displayed on a new page. Only a few fields for each record are displayed, so the field that matched your keyword search may not be shown. To view a listed record, click the View link located to the left of the record.
The advanced search tool gives you the
ability to refine your search to specific data types within
your organization. You can search for records by creation
date or last modified date. You can also narrow your search
to include only records created by you. Save your search
parameter profiles for easy access to the searches you use
most often.
Click the Advanced link in the Search sidebar panel. This takes you to the Advanced Search page.

Click the Advanced link in the Search sidebar panel. This takes you to the Advanced Search page.
- Enter Keywords
- Apple & Orange: Both words must be found.
- Strawberry | Lemon | Kiwi: At least one of these three words must be found.
- ! Pineapple: This word must not be found.
- Search Types:
Specify the data types you want to search for in the Search Types section. Perhaps you only want to search through the solutions, or maybe you want to search solutions and contacts. Click the checkbox next to each listed data type to include it in the search. Click the checkbox at the top of the Search Types section to select all data types.
- Search by Date Created OR Modified:
- Click the Date Created or Date Modified radio button to select which date field to search.
- Click the
 icon
located beside the date type you specified. Choose
a date from the window that pops up.
icon
located beside the date type you specified. Choose
a date from the window that pops up. - Select a search filter from the drop down box. Choose Equals to find records with the same creation or modified date. Choose Greater than to find records that were created or modified after the date you specified, and so on.
- Records to Search:
Specify to search all records you have access to within your organization or search only records that you have created. Click a radio button to make your selection.
- Save the Search:
- Enter a name for the search in the text field provided.
- Click the checkbox located to the left of the text field if you want to save the search.
- The search will be saved when you execute the search by clicking the Search button.
Saved searches are available in the load a
saved search drop down box, located just under
the Search text field. Also see Step
1.
- Perform the Search:
Click the Search button to execute the search using the parameters you have specified. The search results will then be displayed.
Enter the keywords you want to search
for in the Enter keywords text field.
When searching for multiple words use the | character
between two words to find records containing either word.
Use the & character between two words to find records
that contain both words. Place the ! character in front
of a word to find documents that do not contain that
word. For example, consider the following search string:
Apple & Orange & Strawberry
| Lemon | Kiwi ! Pineapple
Here is how the search is performed:
Favorite Links
This feature allows you to create shortcuts to your
favorite web sites. Shortcuts to web sites for frequent use by your company
are also available.
Using My Favorites and Company Favorites
Adding a New Web Link to My Favorites
Using My Favorites and Company Favorites
 |
Web links that you create are listed under Favorite
Links. Favorite links for the entire company are created
by the Administrator and are listed under Company Links.
All company users can access these. To use a link, simply click on
it. A new web browser will be opened to display the web site for
the link you chose.
Adding a New Web Link to My Favorites
- Click the Edit Favorite Links link located at the bottom of the Favorite Links panel. This will take you to the Edit page.
- Type the web address of one of your favorite web sites in the URL text field. This must be a complete web address, such as http://www.salesboom.com
- Add a descriptive title for the URL in the Title field. This title will be displayed in your Favorite Links panel.
- Click the Add Link to My Favorites button.
- Click the Edit Favorite Links link located at the bottom of the Favorite Links panel. This will take you to the Favorites page.
- Type the web address of one of your favorite web sites in the URL text field. This must be a complete web address, such as http://www.salesboom.com
- Add a descriptive title for the URL in the Title field. This title will be displayed in your Favorite Links panel.
- Click the Add Link to Company Favorites button.
- Click the Edit Favorite Links link located at the bottom of the Favorite Links panel. This will take you to the Edit page.
- All of your favorite links are listed under Favorite Links. Click the Delete button located to the right of the link you want to delete.
- System Administrators can likewise delete links located in under the Company Favorites section.
 |
Item History
Item History is a list of all items
that have been recently viewed or created. The icon next to each link
denotes what type of item it is. Hold the mouse pointer over an item
icon to see what type it is. It could be a contact, lead, account etc.
Click any of the listed links to view the item in detail.
Messenger
The Messenger panel allows you to
send instant messages to salessoom.com users within your organization.
Instant Message Watcher
Instant Message Watcher
Each time you log in you will notice that
a separate window opens. This is the Instant Message
Watcher. It is on the watch for incoming instant messages
from other Salesboom.com users. The Instant Message
Watcher starts up as soon as you log into salesboom.com
To stop the Instant Message Watcher from automatically
starting up at login, click the Do Not Start Message
Watcher Automatically link located at the bottom of
the Messenger sidebar panel. To turn this
option back on, click the Start Message Watcher Automatically link
located at the bottom of the Messenger sidebar
panel. When the watcher window is open, you can turn it off
simply by closing the window. To turn it on again, click the Check
Messages link located in the messenger sidebar panel.
However, you don't need to have the watcher window open in
order to receive messages. Salesboom checks for new messages
each time the browser window refreshes.
Sending Messages

Attaching Files
Receiving Messages 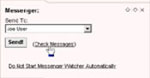 In
order to receive instant messages from other salesboom.com
users the Instant Message Watcher window
must be active. The message watcher appears as an ordinary
window and is visible on your desktop and task bar like
every other window. If you do not see the Instant
Message Watcher window, you will need to activate
it. To activate the message watcher, click the Check
Messages link located in the Messenger sidebar
panel. The Instant Message Watcher window
will open. If you have any messages waiting, they will
appear in an Instant Messages window.
You can then reply to the messages using this window if
you wish.
In
order to receive instant messages from other salesboom.com
users the Instant Message Watcher window
must be active. The message watcher appears as an ordinary
window and is visible on your desktop and task bar like
every other window. If you do not see the Instant
Message Watcher window, you will need to activate
it. To activate the message watcher, click the Check
Messages link located in the Messenger sidebar
panel. The Instant Message Watcher window
will open. If you have any messages waiting, they will
appear in an Instant Messages window.
You can then reply to the messages using this window if
you wish.
Sending Messages
|
|
- To send an instant message to another user, select a username from the Send To drop down box located at the top of the Messenger panel.
- Once a user has been selected, click the Send button located below the drop down box.
- An Instant Messages dialog box will pop up.
- Type your message in the Message text box. There is a 1000-character message limit.
- When you want to send your message, click the Send button located to the right of the message text box.
NOTE: If no users are currently logged in, the Send To drop down box will not be available. Instead, an offline user link is present. Click this link to view a list of company users. Click the Send Message link located to the right of the user you want to send a message to and continue with the steps below.
Attaching Files
Salesboom's Instant messaging Service
Software also allows you to send a file attachment to other
users in your organization.
-
Use the Send To: drop down box in the Messenger sidebar
panel to select a user to send a message to. This will
open the Instant Messages window.
Click the Browse button located toward
the bottom of the Instant Messages window.
This will bring up a Choose File window.
Use this window to browse to the file you want to send.
Once you have found the file, select it and click the Open button.
The Choose File window will close and
the full path to the file you selected will appear in
the Attach File text field of the Instant
Messages window.
Now click the Attach button to attach
the file to the message.
Click the Send button to send your message
and file attachment to the specified user.
To Remove an attached file, select the (Remove) link.
Receiving Messages
Calculator
Use the calculator to perform quick calculations when
you are entering data on a salesboom.com page.
Company Messages
This panel displays a special message for all company
users to read.
Changing the Company Message (Administrators only)
Changing the Company Message (Administrators only)
- Click the Edit Message link.
- Type a new message in the Messages and Alerts text box.
- Click Save Company Message to save the message.
- Users who are currently logged in will see the new message as soon as they perform an action that will refresh their web browser.
To get the latest salesboom.com news and updates,
click the New Features link located at the bottom of the Company Messages
sidebar panel. This will open a new web browser to the SalesBoom.com
home page.
Date & Time
This panel displays the current date and time. The
time and date are in synch with your computer's internal clock.
Calendar
The calendar is an easy and convenient way to keep
track of your busy schedule. You can get a quick view of your scheduled
events for the current week or month as well as a detailed view of each
day.
Navigating the Calendar
Navigating the Calendar
|
|
- To change the month, use the

 icons
located at the top of the calendar.
icons
located at the top of the calendar. - Click any day displayed on the calendar for a detailed view of events scheduled for that day.
- Days that have scheduled events are highlighted in red.
- When viewing events for a particular day or week, use the

 icons
to view the previous or next calendar day or week.
icons
to view the previous or next calendar day or week.
Current Day: For a detailed view
of events scheduled for the current day, click the  icon
located at the bottom of the calendar. This will take you
to the Day View page. This page lists events scheduled for
every hour of the day you selected. Click a listed event
to view the event in detail. Click a listed time of day to
schedule an event for that time.
icon
located at the bottom of the calendar. This will take you
to the Day View page. This page lists events scheduled for
every hour of the day you selected. Click a listed event
to view the event in detail. Click a listed time of day to
schedule an event for that time.
Current Week: For a quick view of events scheduled for the current week, click the icon
located at the bottom of the calendar. This will take you
to the Week View page. This page lists events scheduled
for each day of the current week. Click a listed event
to view the event in detail. Click a listed day to view
all events scheduled for that day. Click Add Event to add
an event for that day.
icon
located at the bottom of the calendar. This will take you
to the Week View page. This page lists events scheduled
for each day of the current week. Click a listed event
to view the event in detail. Click a listed day to view
all events scheduled for that day. Click Add Event to add
an event for that day.
Current Month: For a quick view of events scheduled for the current month, click the link
located at the bottom of the calendar. This will take you
to the Month View page. Click a day of the month for a
detailed view of scheduled events for that day. Click Add
for any listed day to add an event for that day. Click
any listed event for a detailed view of that event.
link
located at the bottom of the calendar. This will take you
to the Month View page. Click a day of the month for a
detailed view of scheduled events for that day. Click Add
for any listed day to add an event for that day. Click
any listed event for a detailed view of that event.
Any Day: For a detailed view of events scheduled for any day displayed on the calendar, first choose the month you want by clicking the icons
at the top of the calendar. Then click the day of the month
you want to view. This will take you to the Day View page.
This page lists events scheduled for every hour of the
day you chose to view. Click a listed event to view the
event in detail. Click a listed time of day to schedule
an event for that time.
See Also: Events
Current Week: For a quick view of events scheduled for the current week, click the
Current Month: For a quick view of events scheduled for the current month, click the
Any Day: For a detailed view of events scheduled for any day displayed on the calendar, first choose the month you want by clicking the
See Also: Events