Salesboom.com Rollout Guide

The Salesboom.com Rollout Guide will walk you through the implementation of your new On-Demand CRM Software Solutions. CRM implementation best practices have been followed while creating this guide to ensure a successful CRM implementation experience.
Click Here to Download the Editable Version
Click Here to Download the CRM Rollout Guide Chart

Table of Contents
1.0 Overview
This guide has been developed to help you get started with Salesboom.com. You will find this step by step guide to be a very useful tool while preparing your business for your new On-Demand CRM Software solution as well as an excellent guide for implementing the Salesboom.com platform.
2.0 Project Team
The first step to a successful CRM implementation is defining your project team and their role in the implementation process. Listed here are the typical team members involved in a successful implementation.
| Role | Description | Names |
| Implementation Sponsor | Driving force behind the Salesboom implementation that helps promote change. | (List Names and Responsibilities) |
| Group Representatives | Each group or team in your company should have a representative that speaks on behalf the users so their thoughts and opinions are heard in a constructive manner. Address the user’s feedback and drive user adoption. | |
| Salesboom Administrator | Responsible for Salesboom implementation. Salesboom is very easy to customize so the administrator chosen does not need to be technical but should have a firm understanding of the business processes so those processes can be modeled in Salesboom. | |
| Salesboom Trainers | Identify employees that can provide training to the end users. Salesboom has a training department; however, it has proven that having employees that can share their Salesboom knowledge speeds up the attrition rate. | |
| Developers | If you are planning on extending the Salesboom platform or need integration with third party applications you may need Technology professionals versed in web services technology. This does not apply to all implementations. |
3.0 Business Objectives
Once you have defined your implementation team the next step is to have a meeting to define the actual business objectives you look to achieve with your new CRM system.
| Business Objective (Fill in Objectives) | Description |
4.0 Business Processes
After your team have developed a clear list and defined the goals of your new CRM Software solution a meeting should be arranged to define your business processes. This is a critical step to successfully implement a new CRM solution but is often overlooked.
| Business Process (Fill in Processes) | Description |
5.0 Preparing to Set-up and Customize the Platform
After your CRM implementation team has been assembled and has agreed upon your business objectives and processes it is time to begin setting up and customizing your platform. This process is typically carried out by your defined system administrator based on the input of your entire team.
6.0 Set-up and Customization
There is a particular approach which should be taken to successfully set-up and customize your Salesboom.com CRM. The steps outlined in this section have been arranged using CRM Rollout best practices designed to ease the process. The first step in this process is setting your security settings and user role hierarchy. This step is followed by the customization of your form fields, layouts, tabs and standard selection lists. Once these steps have been completed you should begin with the data migration process.
6.1 Data Management & Security Settings
This step is in place to determine what access each user has to each object within the system. The options are:
- Public Read/Write
- All data for this object will be shared among all users within the system.
- Public Read Only
- All data for this object will be shared among all users of the system but with Read Only Access.
- Private
- All data for this object is accessible only by the owner of the record.
6.2 User & Role Management
Security settings and user roles are a way of organizing your company’s data permission hierarchy. Users who are assigned to a particular role will only have access to items specific to their role and roles below them. For example, your company’s role hierarchy could be set like this.
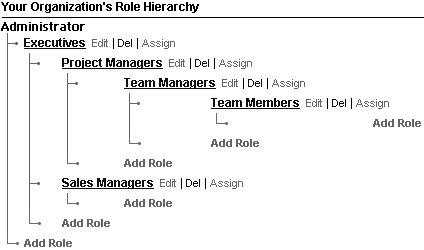 |
| Role Name (Fill in role name) | Description (Fill in role description) | Assigned Users |
6.3 Manage Profiles
Profiles are used to control the actions that users can perform within the system. Take Accounts for example, can the users create, edit, delete and or view specific Accounts. Salesboom.com is equipped with standard profiles that can often meet the requirements of many organizations, from here custom profiles settings can be implemented.
Define security permissions:
| Profile Title (Fill in Profile name) | Description (Fill in Profile description) | Assigned Users |
6.4 Add Users
Now that you have defined your organizations sharing model the next step is to add the users and assign each user to a role and a profile.
6.5 Renaming Standard Tabs
| Original Tab Name (Insert tab name) | New Tab Name (Insert tab name) | Date Modified |
6.6 Define and Customize Standard Forms
6.6.1 Custom Tabs
Tab
Name: |
|
Field Name |
Data
Type |
6.6.2 Custom Fields on Standard Tabs
Tab
Name: |
|
Field Name |
Data
Type |
6.6.3 Page Layouts
Using the Salesboom.com AJAX Layout Editor Users can Drag and Drop fields to desired position within a form.
| Tab Name | Date Modified |
7.0 Modify Standard Selection Lists
Salesboom.com comes standard with many predefined fields that are of type selection list. These lists can be modified to best suit any organization.
Tab
Name: |
|||
Field Name |
Initial
Values |
New
Values |
Date
Modified |
8.0 Data Migration
Now that the system is customized to best suit your business requirements Data Migration can begin. When migrating data into the Salesboom.com system it is important to understand the order of all your files. This must be done to ensure that the correct associations can be made and the proper owners of the records are assigned. At this point all users who will be assigned records must be added to Salesboom.com prior to migrating data. During the Data Migration Process a particular order must be followed.
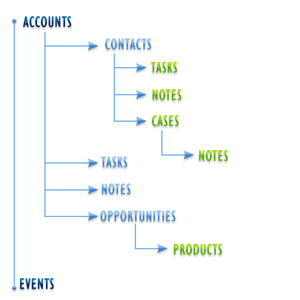 |
Note: Subsidiary records shown in the illustration above can be linked to their parent objects; however this is not a requirement.
8.1 Prepare Data
To prepare your data you must first export data from your current systems into .CSV format. It is highly recommended that once you have the data in a .CSV format you perform a data cleanse to ensure accurate data prior to migration. There are several methods for data preparation, consulting with your IT Specialist is recommended.
8.2 Test Data Import
Prior to importing complete data run some test imports to ensure data is mapped correctly. It is recommended to import no less than 50 to 100 records but no more than 500.
8.3 Complete Full Data Import
Once all the other steps involved in data migration have been completed and a test import has been successfully conducted it is time to import the entirety of your data.
8.3.1 Leads
| Field in Salesboom | Field in .csv file | Successfully Mapped |
| <Field Name> | <Field Name> | |
8.3.2 Accounts
If you have a field that denotes the uniqueness of the account, map it to the Account Number field in Salesboom.com.
| Field in Salesboom | Field in .csv file | Successfully Mapped |
| <Field Name> | <Field Name> | |
8.3.3 Contacts
If you have a field that denotes the uniqueness of the contact, map it to the Unique ID field in Salesboom.com.
| Field in Salesboom | Field in .csv file | Successfully Mapped |
| <Field Name> | <Field Name> | |
8.3.4 Opportunities
If you have a field that denotes the uniqueness of the opportunity, map it to the Unique ID field in Salesboom.com.
| Field in Salesboom | Field in .csv file | Successfully Mapped |
| <Field Name> | <Field Name> | |
8.3.5 Cases
If you have a field that denotes the uniqueness of the case, map it to the Unique ID field in Salesboom.com.
| Field in Salesboom | Field in .csv file | Successfully Mapped |
| <Field Name> | <Field Name> | |
8.3.6 Events
| Field in Salesboom | Field in .csv file | Successfully Mapped |
| <Field Name> | <Field Name> | |
8.3.7 Tasks
| Field in Salesboom | Field in .csv file | Successfully Mapped |
| <Field Name> | <Field Name> | |
8.3.8 Notes
| Field in Salesboom | Field in .csv file | Successfully Mapped |
| <Field Name> | <Field Name> | |
8.3.9 Products
| Field in Salesboom | Field in .csv file | Successfully Mapped |
| <Field Name> | <Field Name> | |
9.0 Review the System
Once data has been imported, the above tables can be used to mark the fields that have been successfully mapped. Once data migration has been verified the next steps are to create custom reports and views and build your workflow automation.
10.0 Create Custom Reports and Views
10.1 Custom Reports
Salesboom.com is equipped with multiple standard reports; if additional reports are required users have the ability to create Custom Reports. Custom Reports allow users to report in many different fashions based on their role in the organization and is easily performed using the Salesboom.com Report Wizard.
10.2 Custom Views
Custom Views are used to filter data into specific records displaying in a list only the information you desire. Creating Custom Views increases employee productivity by allowing them to choose exactly what information is displayed on their screen.
11.0 Set-up Workflow Automation
When setting up your workflow automation rules it is important to take the time to plan these rules out correctly since workflow automation is a highly effective tool when it is properly leveraged.
Rule
Name |
Data
Type |
Trigger
upon |
Conditions |
Reassign
To |
Email
and AJAX Notifications |
| <rule name> | <object> | Create Update |
<list conditions> | <system user> | <List recipients> <List notifications> |
12.0 Email Configuration
12.1 Email Templates
Email templates can be set up using both HTML and plain text formats. These templates allow you to send uniform emails quickly and easily by selecting from your list of pre-existing custom templates. Email templates can be used to send emails from the Salesboom.com email client, directly from a view of your contacts and leads along with the Salesboom.com Drip Marketing Tool.
12.2 External Email Settings
If you prefer to use Salesboom.com as your email client or as an additional email tracking tool you must configure the Salesboom.com External Email Settings. This configuration is for incoming emails and supports POP3 or IMAP.
12.3 Outlook Integration
To integrate Microsoft Outlook with Salesboom.com download and install the Salesboom.com Outlook Plug-in which is available under the Control Panel.
13.0 Additional Salesboom.com Implementation Services
Salesboom.com has many different options for assisting our clients during the implementation process as well as a full lineup of established training programs. Our Professional Services Department is highly trained and ready to help businesses with the entire or particular areas of implementation process with predefined programs like our Fast Track Program along with customized rollout options. Please feel free to contact our Professional Services Department toll free at 1.855.229.2043 (276.7253) or directly at 902.425.3638 for more information.
|
Once you truly gain full visibility into your company's business processes, you'll never want to go back to the dark again. We guarantee it. Take a Free CRM Software 30-day Trial today, or contact us directly for more information: 1.855.229.2043 (1.855.229.2043) or via e-mail at sales@salesboom.com.
|
|||||||
|
|||||||